
Haru VPS MCP
A mini tunnel to a mini computer for ChatGPT.
这是一个给 AI 一台“小电脑”的自托管 MCP Gateway。它把 filesystem / shell / file transfer 能力收进一个独立、可丢弃的 workspace,再通过 MCP 让 ChatGPT 或其他可信客户端使用;host 本身不是 workspace,Haru 和 workspace backend 也都默认只监听 loopback。
This is a self-hosted MCP gateway that gives an AI a tiny computer of its own. It puts filesystem / shell / file transfer capabilities inside an independent, disposable workspace, then exposes them over MCP to ChatGPT or another trusted client. The host itself is not the workspace, and both Haru and the workspace backend bind to loopback by default.
                    your Linux machine

        ┌─────────────────────────────────┐
        │                                 │
AI ---> │  Haru gateway                   │
MCP     │  127.0.0.1:8765                 │
        │          |                      │
        │          v                      │
        │  workspace backends             │
        │  127.0.0.1:8766                 │
        │      |       |       |          │
        │      v       v       v          │
        │ filesystem shell  file transfer    │
        │      \       |       /          │
        │       \      |      /           │
        │        v      v     v            │
        │     /srv/haru-workspace         │
        │                                 │
└─────────────────────────────────┘这份笔记走最短的自建路径:VPS 准备 → 安装 gateway + workspace → OpenAI Secure MCP Tunnel → 验收 / 兼容性。完整实现和 public-safe 运维说明在 kohaku4yz/haru-vps-mcp。
This note follows the shortest self-hosting path: prepare the VPS → install the gateway + workspace → add an OpenAI Secure MCP Tunnel → acceptance / compatibility checks. The full implementation and public-safe operator documentation live in kohaku4yz/haru-vps-mcp.
VPS 准备
VPS preparation
- 先看机器还有多少余量。gateway 本体通常只是几十 MB 量级,真正会 burst 的一般是 workspace / shell 子进程,所以限制优先放在 workspace service。
- First, check how much headroom the machine has. The gateway itself is usually only tens of MB; bursty usage generally comes from workspace / shell child processes, so put resource limits on the workspace service first.
free -h
df -h /
nproc
systemd-cgtop
公开示例里的 MemoryMax=1G、TasksMax=128 只是起点,不是 Haru 的硬要求;按自己的 VPS 调整即可。
MemoryMax=1G and TasksMax=128 in the public examples are starting points, not hard Haru requirements. Adjust them to fit your VPS.
- 创建一个专用、non-sudo 的 service user:
- Create a dedicated, non-sudo service user:
sudo useradd --system --user-group \
  --home-dir /var/lib/haru --create-home \
--shell /usr/sbin/nologin haru- 创建独立 workspace。不要把
/home/you、/root或 production data 当 AI workspace。
- Create an independent workspace. Do not use
/home/you,/root, or production data as the AI workspace.
sudo install -d -o haru -g haru -m 0700 /srv/haru-workspace
sudo install -d -o root -g root -m 0755 \
  /etc/haru-mcp /etc/haru-workspace /opt/haru-workspace
Haru 的公开 systemd workspace example 还会用 ProtectHome=tmpfs、ProtectSystem=strict、独立 HOME=/var/lib/haru-workspace/home 和 ReadWritePaths= 做第二层隔离;单独改 HOME 不等于 filesystem isolation。
Haru's public systemd workspace example adds a second isolation layer with ProtectHome=tmpfs, ProtectSystem=strict, a separate HOME=/var/lib/haru-workspace/home, and ReadWritePaths=. Changing HOME alone is not filesystem isolation.
安装
Install
- 装 Haru gateway:
- Install the Haru gateway:
sudo git clone https://github.com/kohaku4yz/haru-vps-mcp.git /opt/haru-mcp
sudo python3 -m venv /opt/haru-mcp/venv
sudo /opt/haru-mcp/venv/bin/pip install /opt/haru-mcp
sudo install -m 0644 /opt/haru-mcp/deploy/haru-mcp.env.example \
  /etc/haru-mcp/haru-mcp.env
sudo install -m 0644 /opt/haru-mcp/deploy/haru-mcp.service.example \
/etc/systemd/system/haru-mcp.service- 装 loopback workspace backends:
- Install the loopback workspace backends:
sudo python3 -m venv /opt/haru-workspace/proxy
sudo /opt/haru-workspace/proxy/bin/pip install \
  'mcp-proxy==0.12.0' 'mcp==1.27.1'

sudo install -d -m 0755 /opt/haru-workspace/node
cd /opt/haru-workspace/node
sudo npm init -y
sudo npm install --omit=dev \
  '@modelcontextprotocol/server-filesystem@2026.7.10' \
  'shell-exec-mcp@1.2.0'

sudo install -m 0644 /opt/haru-mcp/deploy/workspace/servers.json.example \
  /etc/haru-workspace/servers.json
sudo install -m 0644 /opt/haru-mcp/deploy/workspace/haru-workspace.service.example \
/etc/systemd/system/haru-workspace.service- 启动:
- Start the services:
sudo systemctl daemon-reload
sudo systemctl enable --now haru-workspace.service haru-mcp.service
sudo systemctl --no-pager --full status haru-workspace.service haru-mcp.service
默认就是 127.0.0.1:8765/mcp → 127.0.0.1:8766 的 filesystem / shell / file-ingress backends。需要换版本时先看公开库的 THIRD-PARTY.md,不要随手升级其中一个 pin。
By default, 127.0.0.1:8765/mcp delegates to the filesystem / shell / file-ingress backends on 127.0.0.1:8766. Before changing versions, check the public repo's THIRD-PARTY.md; do not casually upgrade one pin in isolation.
OpenAI tunnel 设置
OpenAI tunnel setup
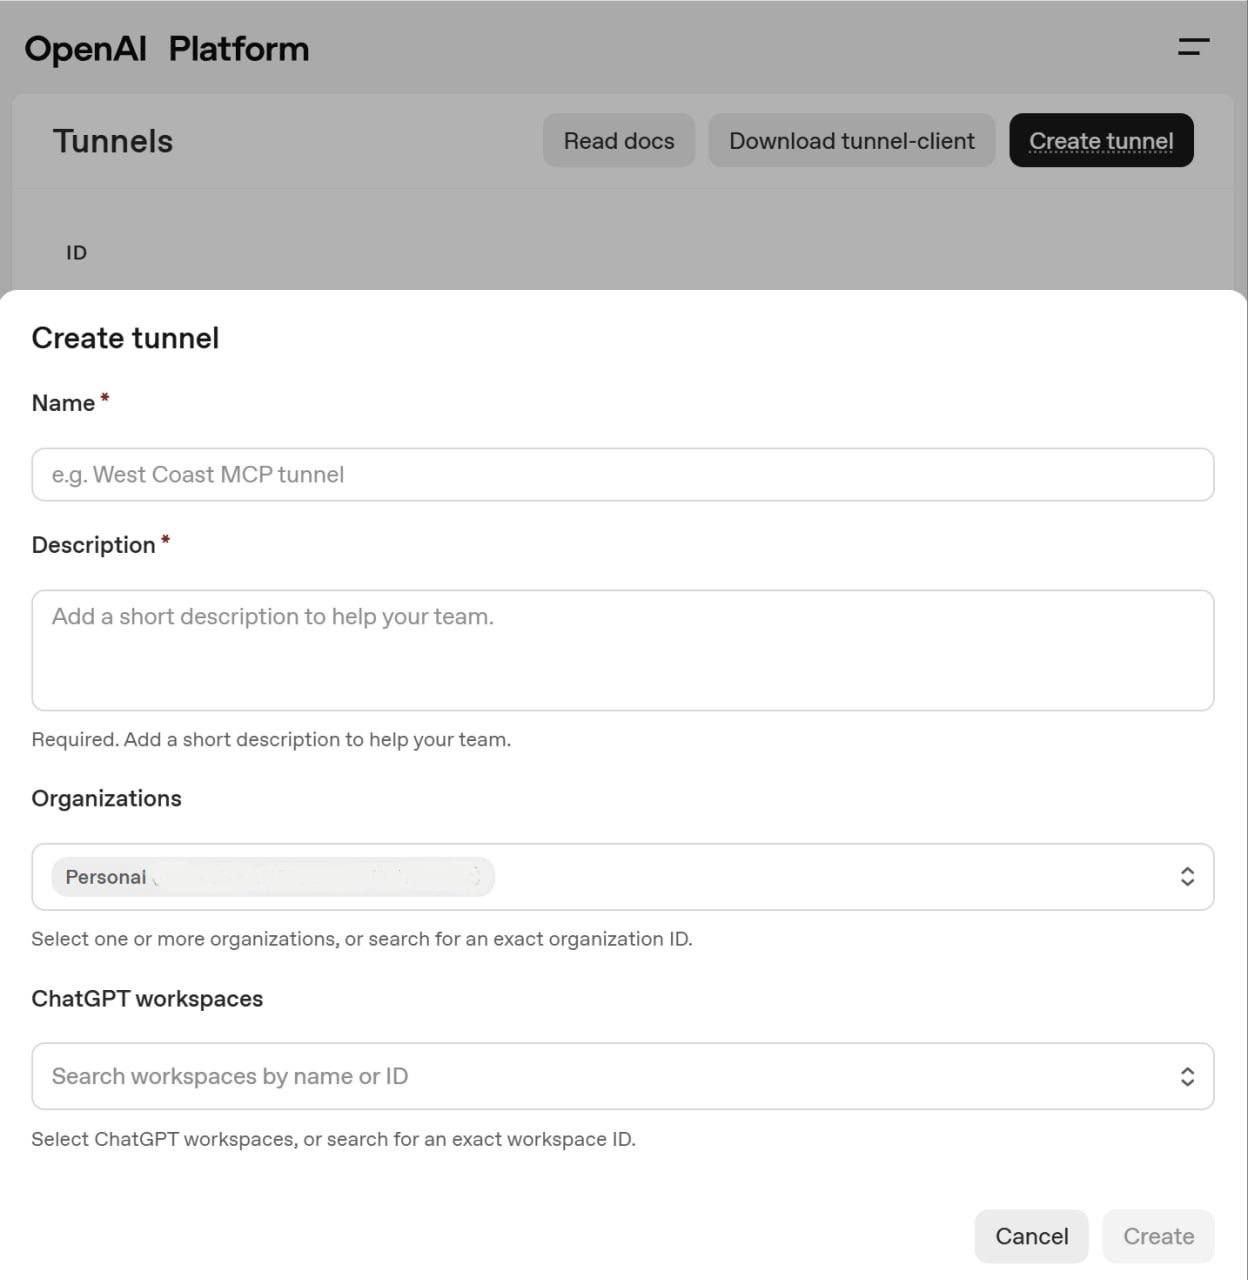
- 打开 OpenAI Platform → Tunnels。创建 / 管理 tunnel 的账号需要 Tunnels Read + Manage;同时把要使用它的 Platform organization / ChatGPT workspace 关联进去。
- 创建 tunnel 后会得到一个
tunnel_id。Haru 不需要因此增加任何公网 listener:tunnel-client会从 VPS 主动向 OpenAI 发起 outbound HTTPS,再把请求转到本机http://127.0.0.1:8765/mcp。 - 在 Runtime API keys 创建给
tunnel-client用的 runtime key。运行 client / 在 ChatGPT 选择 tunnel 的 principal 需要 Tunnels Read + Use;不需要在指南里固定写成all。key 不进 Git。 - 从 Tunnels 页面下载当前支持的
tunnel-client,或使用 openai/tunnel-client latest release。不要把指南钉死在 v0.0.11;官方现在明确建议跟 latest supported release。
- Open OpenAI Platform → Tunnels. The account creating or managing the tunnel needs Tunnels Read + Manage; associate the Platform organization / ChatGPT workspace that will use it.
- Creating the tunnel gives you a
tunnel_id. Haru does not need a public listener:tunnel-clientinitiates outbound HTTPS to OpenAI from the VPS and forwards traffic tohttp://127.0.0.1:8765/mcp. - Create a runtime key for
tunnel-clientunder Runtime API keys. The principal running the client / selecting the tunnel in ChatGPT needs Tunnels Read + Use. Do not hard-code anallrole here, and keep the key out of Git. - Download the currently supported
tunnel-clientfrom the Tunnels page, or use the latest openai/tunnel-client release. Do not pin this guide to v0.0.11; follow the latest supported release.
先做 foreground canary:
First, run a foreground canary:
export CONTROL_PLANE_API_KEY='sk-...'
tunnel-client init \
  --sample sample_mcp_remote_no_auth \
  --profile haru-vps-mcp \
  --tunnel-id 'tunnel_...' \
  --mcp-server-url 'http://127.0.0.1:8765/mcp'

tunnel-client doctor --profile haru-vps-mcp --explain
tunnel-client run --profile haru-vps-mcp
跑通后再交给 systemd。生产验证过的一种边界是:单独的 haru-tunnel 用户 + /etc/haru-tunnel/tunnel.env(root:root, 0600),至少把 CONTROL_PLANE_API_KEY 留在 Git 外;这样 workspace shell 也读不到 tunnel credential。
Once the foreground path works, hand it to systemd. One production-tested boundary uses a separate haru-tunnel user plus /etc/haru-tunnel/tunnel.env (root:root, 0600), keeping at least CONTROL_PLANE_API_KEY out of Git and unreadable from the workspace shell.
在 ChatGPT 中配置
Configure ChatGPT
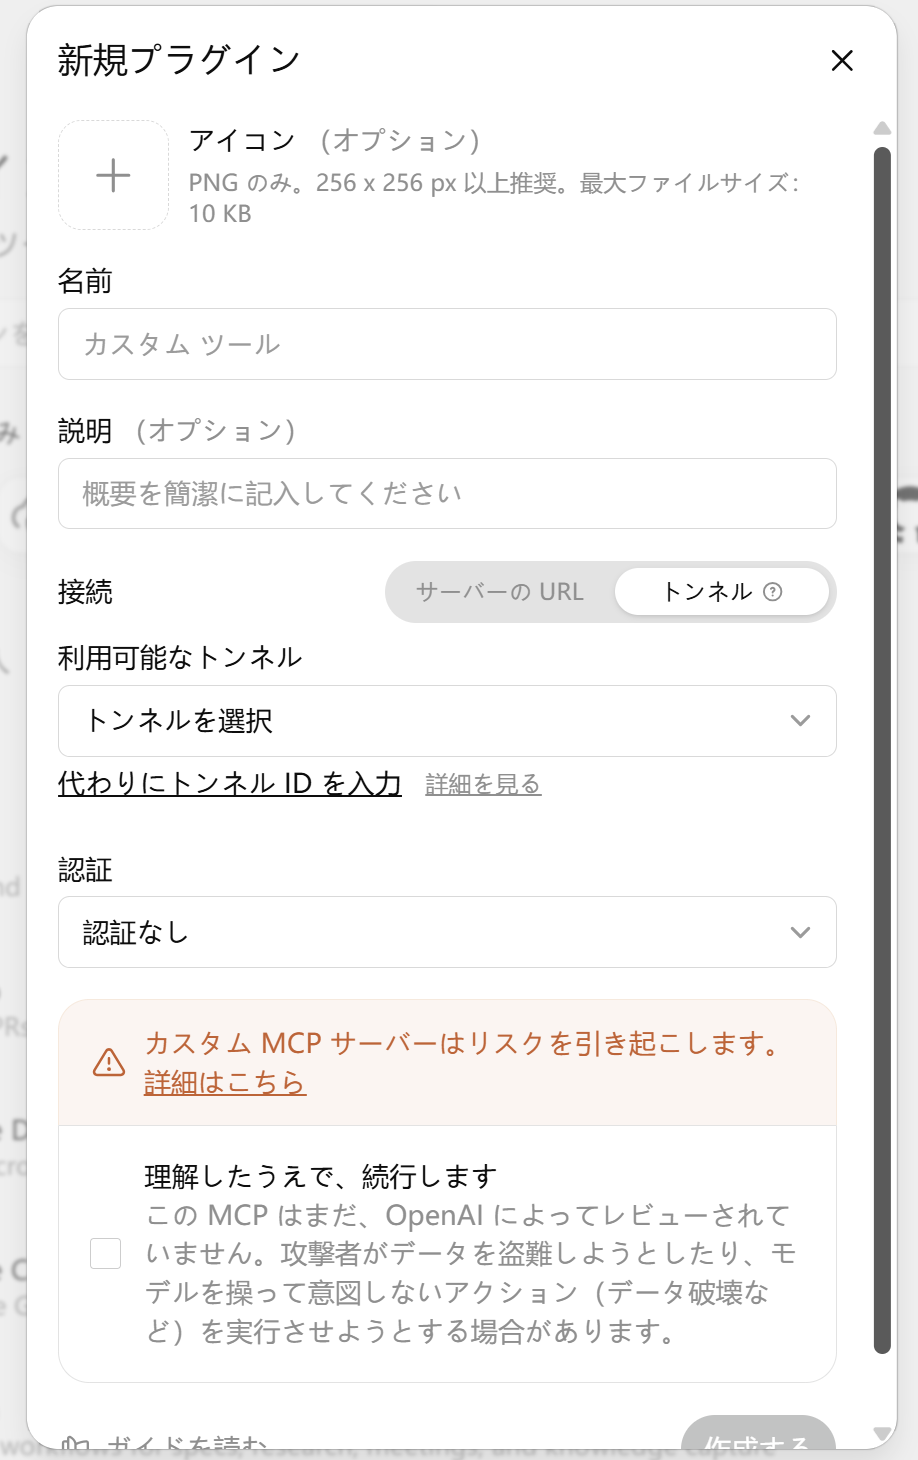
- 按 OpenAI 当前 Developer mode 指南启用 Developer mode;具体入口会随 plan / workspace policy 和产品 UI 变化。
- 新建 developer-mode app → Connection 选择 Tunnel → 选择或粘贴刚才的
tunnel_id。 - Haru 本身没有额外 OAuth,所以如果 UI 询问 app-level authentication 时选 None / 无认证。这里的“无认证”只指 tunnel 后面的 Haru server;外层远程访问仍由 Secure MCP Tunnel 承担,不会公开裸奔。
- Scan tools / Create。开一个新聊天选中这个 app(或 @ 它),先调用
health,再做一次 harmlessworkspace_list_directory。
- Enable Developer mode using OpenAI's current Developer mode guide. Exact entry points can change with plan, workspace policy, and product UI.
- Create a developer-mode app → choose Tunnel for the connection → select or paste the
tunnel_id. - Haru does not add its own OAuth layer, so if the UI asks for app-level authentication choose None. “None” only describes the Haru server behind the tunnel; remote access is still protected by Secure MCP Tunnel and is not anonymously public.
- Scan tools / Create. In a new chat, select the app (or @ mention it), call
health, then make one harmlessworkspace_list_directorycall.
验收
Acceptance
haru-mcp.service和haru-workspace.service都是 active;workspace backend 仍只在 loopback。tunnel-client的/healthz= live、/readyz= ready(health listener 默认也应该留在 loopback)。- 真正从 ChatGPT 发现 Haru tools,并成功调用一次
health+ 一次 harmless workspace read/list。 - 把启动 tunnel 的 SSH session 关掉,再开一个新 ChatGPT 对话重复一次。这样才证明 tunnel 是被 service manager 托住,不是靠当前 shell 活着。
haru-mcp.serviceandharu-workspace.serviceare active; the workspace backend is still loopback-only.tunnel-clientreports/healthz= live and/readyz= ready; keep its health listener on loopback too.- From ChatGPT, discover the Haru tools and successfully call
healthplus one harmless workspace read/list. - Close the SSH session used to start/configure the tunnel, open a fresh ChatGPT conversation, and repeat the harmless call. This proves the tunnel is owned by the service manager rather than the current shell.
兼容性
Compatibility
- ChatGPT:推荐 Secure MCP Tunnel + developer-mode app。连接的 custom MCP server 不再要求必须有
search/fetch命名的工具,但 ChatGPT 实际可执行哪些 actions 仍取决于当前 plan 和 workspace policy。OpenAI 当前文档说明:包含 write / modify actions 的完整 MCP 目前面向 Business / Enterprise / Edu;Pro 的 developer-mode MCP 当前仅支持 read / fetch 权限。设置前请查看 最新 Developer mode 文档。 - Codex / Responses API:OpenAI 的 Secure MCP Tunnel 也支持这些 surface;仍然保持 Haru 私有、loopback-only。
- 其他 MCP client:Haru 本身是 Streamable HTTP MCP;只要 client 在可信网络里能到
http://127.0.0.1:8765/mcp(或你自己提供的受认证私有路径)就可以对接。OpenAI Secure MCP Tunnel 本身是 OpenAI 专用 transport。
- ChatGPT: Secure MCP Tunnel + a developer-mode app is the recommended private path. Connected custom MCP servers no longer need tools named
search/fetch, but the actions ChatGPT can actually execute still depend on the current plan and workspace policy. OpenAI's current documentation says full MCP, including write / modify actions, is currently available to Business / Enterprise / Edu, while Pro developer-mode MCP currently supports read / fetch permissions only. Check the latest Developer mode documentation before setup. - Codex / Responses API: OpenAI Secure MCP Tunnel also supports these surfaces; keep Haru private and loopback-only.
- Other MCP clients: Haru itself is a Streamable HTTP MCP server. Any client that can reach
http://127.0.0.1:8765/mcpover a trusted network (or through another authenticated private path you provide) can connect. OpenAI Secure MCP Tunnel itself is an OpenAI-specific transport.
Read More ⬇️
- README — 架构和安全边界
- WORKSPACE-BACKENDS.md — workspace backends 和 systemd 隔离
- SECURE-TUNNEL.md — tunnel 运维边界
- OPERATIONS.md — 日常运维 / rollback / secrets
- THIRD-PARTY.md — upstream pins / license / provenance
- README — architecture and security boundary
- WORKSPACE-BACKENDS.md — workspace backends and systemd isolation
- SECURE-TUNNEL.md — tunnel operations and trust boundary
- OPERATIONS.md — day-to-day operations / rollback / secrets
- THIRD-PARTY.md — upstream pins / licenses / provenance